The Alerts Schedules page allows administrators to view and manage all existing alert schedules, their associated executions and rendered alert messages.
Admins can access the main schedule listing, the job executions panel and the outputs panel
- Use the Task Manager to see a listing of all alert tasks in a single listing, without the schedule definitions.
Open the Alerts Schedule List
From the Admin Console, select Schedules > Alerts. The Schedule List opens. By default, only the Schedule list (purple highlight below) is shown in the main view.
Schedule List
From the Alerts page, you can select a row to view any associated Job Executions (yellow highlight) and then select a Job Execution to view any output (blue highlight), as shown below:
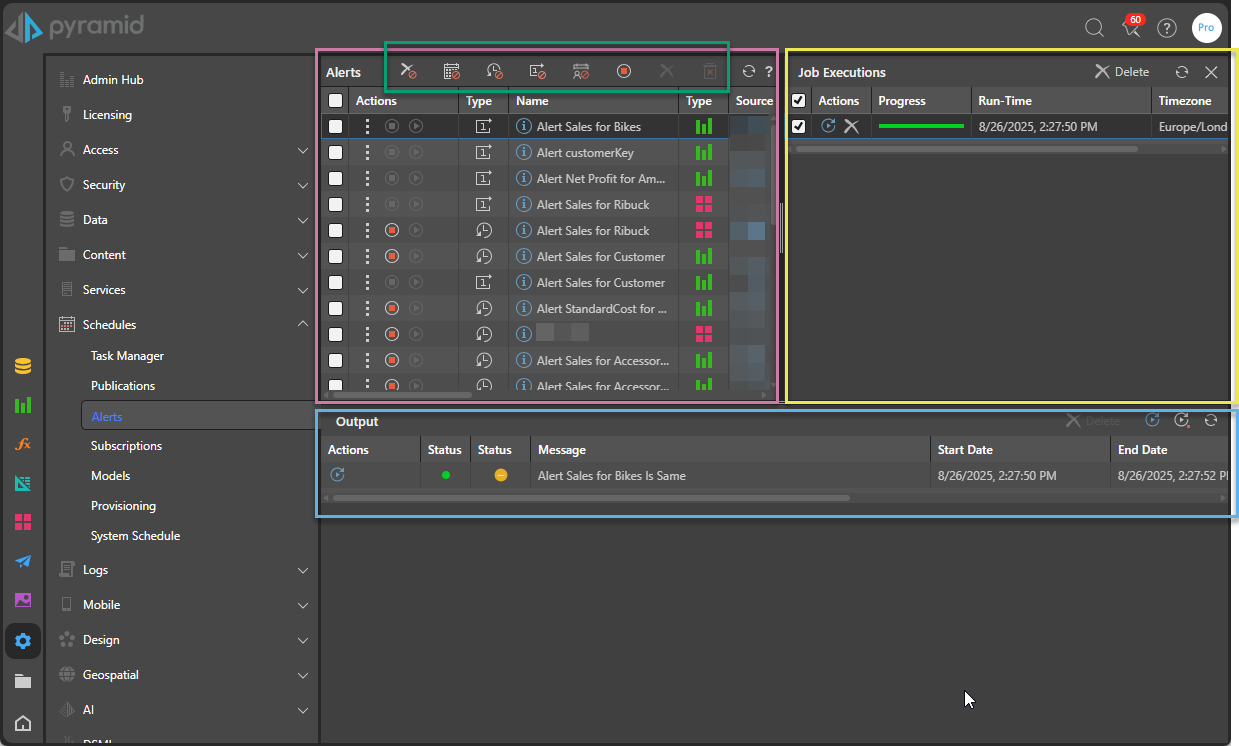
Alerts panel
Each listed schedule (purple highlight above) displays:
- Actions: Take an action, like stopping or editing the alert schedule. See below for details.
- Alert Name: The name of the schedule job.
- Source: The name given to the content item from which the alert was built.
- Type: The icon indicates the schedule type; one-off (with a "1" icon), recurring (with a clock icon), or on demand (with a calendar icon).
- Owner: The user who currently owns the schedule job.
- Start Date: The start date and time of the schedule job.
- End Date: The end date and time of the schedule job (if the schedule was recurring, and an end date was assigned to it).
- Creation Date: The date and time that the schedule was created.
- Description: The description given to the alert job file.
- Schedule ID: The ID of the schedule job.
Actions
From the Actions panel of each schedule, admins can:
- Stop Schedule: Click to stop the schedule job - it can be restarted if needed. If the schedule type was Once or the schedule has ended, the Stop button will be disabled.
- Start Schedule: Click to start a schedule that was stopped. If the schedule type was Once or the schedule has ended, the Start button will be disabled.
- Info Icon: Hovering over the icon will show:
- Creation Date: The date and time that the schedule was created.
- Schedule ID: The ID of the schedule job.
- From the action menu:
- Edit Schedule: Click to edit the schedule. See below.
- Delete Schedule: Delete the schedule.
- Go to Item Location: Go to the publication's location in the CMS.
- Change Owner: Change the schedule owner. See below.
- Copy : Copy the schedule
- Load Discover Snapshot: Open a snapshot of the discovery and query results from the time the alert was configured.
- Open Item: Open the content item.
- Audit Trail: View the schedule's audit history.
Clicking on the schedule will open the Job Executions panel (see below).
Edit a Schedule
Click a schedule's Edit icon from its Actions column to open the Edit schedule panel, where you can define the schedule and distribution for the alert.
Change Schedule Ownership
Change the schedule's owner if the user driving the schedule needs to be changed (or the password reset when using an provided account). Click the Change Owner item in the Actions menu to open the Change Schedule Ownership dialog. The dialog displays the schedule name and the current schedule owner. Select the new schedule owner from the dropdown list and click Apply.
Job Executions
Click on an item in the schedule list to open its Job Executions panel (yellow highlight above) , where you can rerun the job, see its progress, and see the date and time the job was last executed.
Output
Click on a job to open its Output panel (blue highlight above) where you'll see:
Output Header
Above the Output list are buttons to:
- Rerun All: This reruns all tasks, which is the same as rerunning the entire job.
- Rerun All Failed: This reruns only those tasks that failed.
- Refresh: Refreshes the current list.
Output List
- Actions: Re-run the job.
- Status: The status of the alert execution (successful in green, pending in yellow, or error in red).
- Status: Indicates whether the given alert type (up, down, or same) was met.
- Message: Indicates the message generate in the alert.
- Start Date: The start date and time of the alert execution.
- End Date: The end date and time of the alert execution.
Schedule Manager Macro buttons
Filter List
Toggle the following options (green highlight above) to show and hide schedules based on their current status:
- Deleted: Show or hide deleted schedules.
- Inactive on demand: Show or hide on demand schedules that are no longer active.
- Inactive recurring: Show or hide recurring schedules that are no longer active.
- Expired one offs: Show or hide non-recurring schedules that have expired.
- Ownerless schedules: Allows managers to view all schedules where the owners have been deleted. The deleted owner will be displayed in the Previous owner column. A new owner can be assigned by performing the Change Owner action.
Note: All of the preceding filters are "hidden" by default.
Selected Alert Actions
When you select one or more schedules using the checkboxes at the beginning of each row, the following macro buttons become enabled:
- Purge - Hard-deletes the selected schedules and all their associated content and outputs.
- Delete - Soft-deletes the selected schedules, removing them from the list.